
Home Energy Audit Cost in 2025: Is It Worth It?
You own an older home, and you’re tired of the drafty rooms, the sky-high energy bills, and the nagging feeling that you’re just throwing money out the window—literally. You’ve heard about “home energy audits,” but figuring out the actual home energy audit cost brings a wave of questions and anxieties. Is it just another way for a contractor to find “a ton of things wrong” and hand you a massive quote? As one homeowner worried, “Home energy audits are probably ripe with people that just happened to find a ton of things wrong, and would you believe it they can fix it themselves as well!” Will it even make a difference, or is it a waste of money?
You’re feeling overwhelmed, maybe even a little skeptical, and that’s completely understandable. The fear of sticker shock, high-pressure sales tactics, and confusing technical jargon is enough to cause “paralysis by analysis.”
This guide is designed to cut through that noise.
Our mission is to be your financial translator. We’ll break down the real costs of a professional energy audit in plain English, show you how to calculate if it’s a smart investment for your older home, and give you a clear, step-by-step plan to take control of your home’s energy use. By the end of this article, you will feel more informed, confident, and ready to make a decision that’s right for your wallet.
The Real Cost of a Professional Energy Audit in 2025
Let’s get straight to the point. For a comprehensive professional energy audit that includes the essential diagnostic tools needed for an older home (like a blower door test), you should expect the cost to be in the $400 to $700 range. While the U.S. national average is around $437, the price can realistically fall anywhere between $212 and $698. This initial number can cause “sticker shock” for many homeowners, and it’s a primary reason they hesitate.
The final price tag isn’t arbitrary; it’s determined by several key factors. Home size is a primary driver, as a larger home simply takes more time to inspect and test. Geographic location also plays a significant role, as labor rates vary across the country; an audit in a high-cost-of-living area will naturally be more expensive. Finally, the age and complexity of your home are critical. Pre-1980 houses often have unique construction challenges—like uninsulated wall cavities or a history of renovations—that require more time and expertise to diagnose properly, influencing the final cost.
Average Home Energy Audit Cost by Region
While a national average is a helpful starting point, the cost of a home energy audit varies significantly across the United States. Factors like regional labor rates, local market competition, and even climate—which dictates the complexity of the heating and cooling analysis required—all play a role in the final price you’ll pay. The Northeast, for example, often sees higher costs due to higher labor rates, whereas the South tends to be more moderate.
Here is a breakdown of what you can typically expect to pay for a comprehensive, unsubsidized energy audit in your part of the country:
| Region | State(s) Example | Typical Cost Range |
| Northeast | MA, NY, CT | $500 – $900 |
| Midwest | OH, IL, MI | $350 – $650 |
| South | TX, FL, GA | $300 – $550 |
| West | CA, CO, WA | $450 – $800 |
How to Save Money with Subsidized Utility Programs
That regional sticker shock might seem intimidating, but here is the single most important piece of advice you will get: the numbers in that table represent the unsubsidized market rate. The best strategy for any homeowner is to start by contacting your local utility company. Many states and utilities have created exceptional programs that dramatically reduce or even eliminate the cost of an audit for their customers.
These programs are designed to be the gateway to making energy efficiency accessible and affordable. For instance, the Mass Save program in Massachusetts, funded by a small fee on utility bills, provides comprehensive home energy assessments at no cost to any resident. Similarly, the NYSERDA program in New York offers no-cost audits to all owners of 1-4 family homes, effectively removing the financial barrier for millions of homeowners. Before you ever agree to pay the full market rate, a five-minute phone call to your utility could save you hundreds of dollars.
Is a Home Energy Audit Worth It for an Older Home? The ROI Question
This is the core of it all: after understanding the initial home energy audit cost, is the investment actually worth it? For an older home, the answer is almost always a resounding yes. The return on your investment comes not just from savings, but from preventing catastrophic financial mistakes.
How Much Does a Home Energy Audit Save?
According to the U.S. Department of Energy, implementing the changes recommended in an audit can cut your energy bills by 5% to 30%. For a typical family, that can add up to hundreds, or even thousands, of dollars in savings every year. For example, simply sealing the air leaks an audit finds can reduce your annual energy costs by 10% to 20% on its own. One homeowner who went through the process reported dramatic results: “We went from 153% more energy use than a new build (based on sqft) to 30% less. Utility bills went from $4,860 per year to approximately $2,500”.
The “It’s Not the Windows” Revelation
The single greatest value of an audit is that it acts as an insurance policy against misinvestment. Many homeowners feel drafts and assume they need to spend $20,000 on new windows. They might be shocked when an audit reveals the truth. As one homeowner discovered, an audit showed that the best money to spend “was not on the windows (it was placed last), but attic insulation”.
An audit might use a blower door test to prove that 80% of your home’s air leakage comes from the attic and basement—problems that can be fixed for a fraction of the cost of new windows. An audit replaces guesswork with a data-driven financial roadmap, preventing you from spending a huge sum of money on the wrong solution.
A professional audit is specifically designed to uncover the top five high-impact energy problems common in pre-1980 homes:
- Inadequate Attic Insulation: This is often the most common and cost-effective problem to fix in an older home. Many homes from this era have far less insulation than modern standards require, and it’s often degraded or displaced.
- Whole-House Air Leakage: Older homes are notoriously “leaky” due to decades of settling and less precise construction methods. These leaks occur around windows, doors, electrical outlets, and, most significantly, through unsealed gaps between the attic and the living space.
- Uninsulated and Leaky Ductwork: If your ducts run through an unconditioned attic or crawlspace, they are often poorly sealed and uninsulated. This means a huge percentage of the air you pay to heat or cool is lost before it ever reaches your rooms.
- Outdated and Inefficient Heating Systems: Furnaces, boilers, and water heaters from this era were not built for efficiency and can waste a tremendous amount of fuel. They are also frequently “oversized,” causing them to cycle on and off inefficiently and wear out faster.
- Single-Pane Windows and Unsealed Doors: Original single-pane windows have almost no insulating value and are a major source of heat loss and drafts.
Calculating Your Payback Period: A Real-World Example
To translate audit recommendations into a financial decision, the most useful calculation is the Simple Payback Period. This answers the question: “How long will it take for my energy savings to completely pay for the cost of the upgrade?” The formula is straightforward:
Simple Payback Period (in years) = Final Homeowner Cost / Annual Energy Savings
A quality audit report provides all the necessary figures to do this math for each recommendation. Let’s walk through a realistic scenario for an attic upgrade in a pre-1980 home:
- Gather Data from the Audit Report:
- Recommended Upgrade: Air seal the attic floor and add blown-in cellulose insulation.
- Contractor’s Quoted Cost: $3,500
- Auditor’s Estimated Annual Energy Savings: $700
- Account for Financial Incentives:
- Local Utility Rebate: Assume a $500 rebate.
- Net Cost After Rebate: $3,500 – $500 = $3,000 (This is what you pay the contractor).
- Federal Tax Credit (30%): $3,000 x 0.30 = $900
- Final Homeowner Cost (Your Investment): $3,000 – $900 = $2,100
- Calculate the Simple Payback Period:
- Payback Period = $2,100 / $700 per year = 3.0 years

In this scenario, the project completely pays for itself in just three years. For every year after that, the $700 in savings is a direct, positive return to your budget—all while making your home significantly more comfortable. This is the kind of data-driven decision-making an audit enables.
What’s Actually Included in a Professional Home Energy Audit?
A real audit is a systematic investigation of your home as an integrated system. It demystifies your home’s performance issues. The process generally follows five steps:
- Step 1: The Interview & Pre-Audit Preparation: The process begins with you. A good auditor will want to understand your experience in the home. This is your chance to provide a detailed list of known problems, like drafty rooms, uneven temperatures, or moisture issues. To prepare for a home energy audit, you should also gather at least 12 months of your energy bills. This data helps the auditor focus their investigation on your specific concerns.
- Step 2: Exterior and Interior Visual Inspection: The auditor conducts a meticulous top-to-bottom inspection of the home. This isn’t just a casual walkthrough. They will examine the condition of the exterior walls and foundation, assess the type and depth of insulation in accessible areas like the attic and crawlspace, and evaluate the age and condition of all your mechanical systems (furnace, water heater, etc.).
- Step 3: Health & Safety Inspection: This is a critical and non-negotiable part of any professional audit. The auditor will perform combustion safety testing on fuel-burning appliances like your furnace, boiler, and water heater. This ensures these appliances are properly venting harmful gases like carbon monoxide outside and not leaking them into your home.
- Step 4: Diagnostic Testing: This is the core of the audit, where objective data replaces guesswork. The auditor deploys specialized equipment to measure your home’s performance. This phase is where the real “aha!” moments happen for homeowners.
- Step 5: The Final Report and Recommendations: After the on-site assessment, the auditor synthesizes all the visual observations and diagnostic data into a comprehensive report. This document, typically delivered within a few days, is your roadmap for improvements, prioritizing fixes based on cost-effectiveness.
Two diagnostic tools are absolutely essential for a legitimate audit:
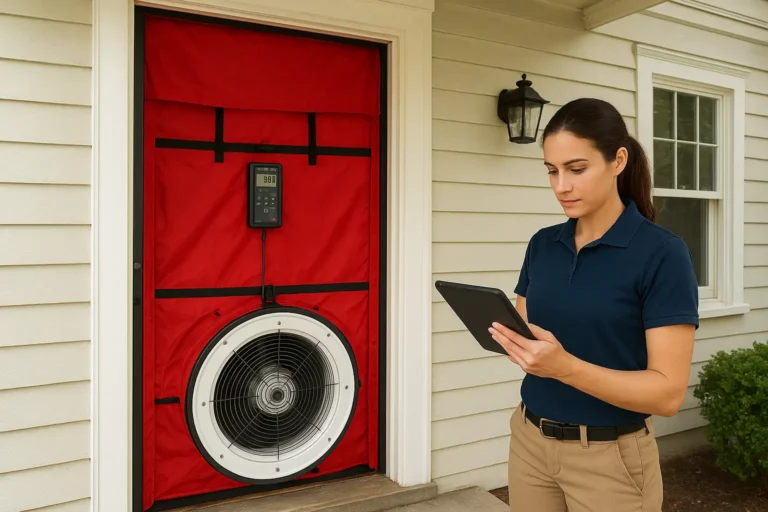
- The Blower Door Test: This is a powerful fan mounted in an exterior door that pulls air out of the house to create a slight negative pressure. This test gives a precise measurement of your home’s total air leakage rate. The blower door test cost is bundled into the total price of the audit. By exaggerating the leaks, it allows the auditor to walk through the house and pinpoint exactly where the drafts are coming from. This is how homeowners make surprising discoveries. One reported: “The blower door test was the biggest value for me… Discovered my closet door casings were leaking like sieves. Caulked it up later that day and the back half of the house was much less drafty.”
- The Infrared (Thermal Imaging) Camera: An infrared camera “sees” heat, creating a visual map of the surface temperatures in your home. This is the most powerful tool for finding missing or defective insulation inside walls and ceilings, which shows up as cold (blue/black) spots in winter. When used with the blower door, it provides a dramatic visual of where cold air is leaking in.
A common “red flag” of a poor auditor is a rushed process where they don’t explain their findings. A great auditor will take the time to show you the thermal images, let you feel the drafts during the blower door test, and patiently answer your questions. This hands-on experience is often what builds a homeowner’s confidence in the recommended fixes.
Have you had your own experience with a home energy audit? Share what you learned in the comments below!
DIY Home Energy Audit vs. Hiring a Professional
To save on the professional home energy audit cost, you might be wondering if you can just do this yourself. A DIY energy audit is an excellent first step and a no-cost way to get familiar with your home and tackle low-hanging fruit. You can use simple methods to find obvious problems:
- The Incense Test: Light a stick of incense and hold it near window edges, door frames, and electrical outlets. If the smoke wavers or blows sideways, you have a leak.
- Check Attic Insulation: Visually inspect your attic insulation. Use a ruler to measure its depth and look for any areas where it’s compressed, missing, or disturbed.
However, for an older home, a DIY-only approach has critical limitations:
- It Can’t Quantify the Problem: A DIY audit can show you that a window is drafty, but it can’t tell you the home’s total leakage rate or how it compares to building standards.
- Hidden Problems Remain Hidden: The most expensive energy problems are usually invisible. A DIY assessment cannot find a wall cavity that was never insulated or a disconnected heating duct buried in a crawlspace. These can only be found with an infrared camera and a blower door.
- The Critical Safety Risk of Backdrafting: This is the most serious limitation. As you seal air leaks, you make your house more airtight. In an older home with a fuel-burning furnace or water heater, this can create a dangerous situation where exhaust fans can pull toxic combustion gases, including deadly carbon monoxide, back into your home. A professional auditor performs mandatory safety testing to prevent this exact scenario.
Think of it this way: a DIY audit is a valuable self-education phase, while a professional audit is the essential diagnostic phase needed to make major financial decisions safely and effectively.
How to Hire a Qualified Auditor (and Avoid Scams)
The fear of being scammed by a high-pressure salesperson is one of the biggest things that holds homeowners back. The key to avoiding this is knowing how to vet a professional.
First, look for auditors with credentials from one of the two industry gold-standard organizations:
- BPI (Building Performance Institute): BPI’s training is focused on diagnosing and retrofitting existing homes. The BPI Building Analyst certification places a heavy emphasis on diagnostic testing and crucial combustion appliance safety protocols, making it exceptionally well-suited for owners of pre-1980 homes.
- RESNET (Residential Energy Services Network): RESNET is primarily known for the HERS Index, the industry standard for rating the energy performance of new construction. While HERS Raters are highly qualified professionals, their training is often more oriented toward new homes.
To ensure you’re hiring a true professional, use this checklist of critical questions to ask before you sign anything:
- “What specific certifications do you hold? Are you a BPI Building Analyst?” This confirms their qualifications and that their report will be eligible for tax credits.
- “Can you provide references from recent clients with homes similar in age to mine?” This is the best way to gauge their experience with projects like yours.
- “Will the audit include both a blower door test and an infrared inspection?” The answer must be “yes.” Without these tools, it’s not a comprehensive audit.
- “Will you perform a full combustion safety test on my furnace and water heater?” This is a non-negotiable safety procedure for any home with fuel-burning appliances.
- “Can you provide a sample of a final audit report?” This is the best way to see the quality and clarity of their work before you commit.
- “Does your report prioritize recommendations by cost-effectiveness and include estimated costs, savings, and payback periods?” This ensures the report is an actionable financial tool.
- “Do you also work as a contractor to perform the recommended upgrades?” This uncovers a potential conflict of interest. If they do, it’s wise to get a competing bid for the work from another company.
- “How long will the on-site audit take, and what do you need from me?” This sets clear expectations for the visit, which typically takes 2-4 hours.
- “How familiar are you with current federal tax credits and local utility rebates?” A knowledgeable auditor should be up-to-date on the incentives that will save you money.
- “Will the audit and report you provide meet all requirements for me to claim the federal Energy Efficient Home Improvement Tax Credit?” This is a final confirmation that their service will allow you to claim the available credit.
Your Audit is Done. What’s Next? (The Action Plan)
The final report is your roadmap. To avoid feeling overwhelmed, you should tackle upgrades using a logical sequence based on building science principles, which can be remembered as: Seal, Insulate, Ventilate, Upgrade.

- Priority 1: Seal Tight. The first and most cost-effective step is always to stop air leakage. This means sealing gaps in your attic and basement. Air sealing makes your insulation effective; it’s pointless to add insulation if drafts can just blow right through it.
- Priority 2: Insulate Right. Once the house is airtight, you add insulation to slow heat transfer, starting with the attic.
- Priority 3: Ventilate Right. An airtight home needs good mechanical ventilation (like bathroom and kitchen fans vented to the outdoors) to manage moisture and maintain healthy indoor air quality.
- Priority 4: Upgrade Equipment. Only after you’ve improved the home’s envelope (sealed and insulated) should you consider replacing your HVAC equipment. By reducing the heating and cooling load first, you can now install a smaller, less expensive, and more efficient system, a major source of long-term savings.
A Critical Financial Motivator: Expiring Tax Credits
Here is the final piece of the financial puzzle, and it’s an urgent one. The U.S. government offers a powerful suite of tax credits to make these upgrades more affordable, but they are not permanent.
CRITICAL URGENCY: The Energy Efficient Home Improvement Credit (Section 25C) is scheduled to expire for all projects completed after December 31, 2025. This hard deadline means you must plan and complete your work by the end of 2025 to claim these substantial savings.
Here’s how they work:
- The Audit Itself: You can claim a tax credit for 30% of the cost of your energy audit, up to a maximum of $150. This immediately reduces the net cost of the audit.
- The Upgrades: You can claim a credit for 30% of the cost of qualifying upgrades, with a total combined annual limit of $3,200 per year. This includes up to $1,200 for insulation and air sealing materials and a separate cap of $2,000 for high-efficiency heat pumps.
Investing in an audit now is a time-sensitive strategic decision. It is the essential first step to unlocking a clear path to capturing thousands of dollars in federal tax credits before they disappear, transforming what feels like an overwhelming project into a smart, manageable, and highly profitable investment in your home.
One Comment
Comments are closed.